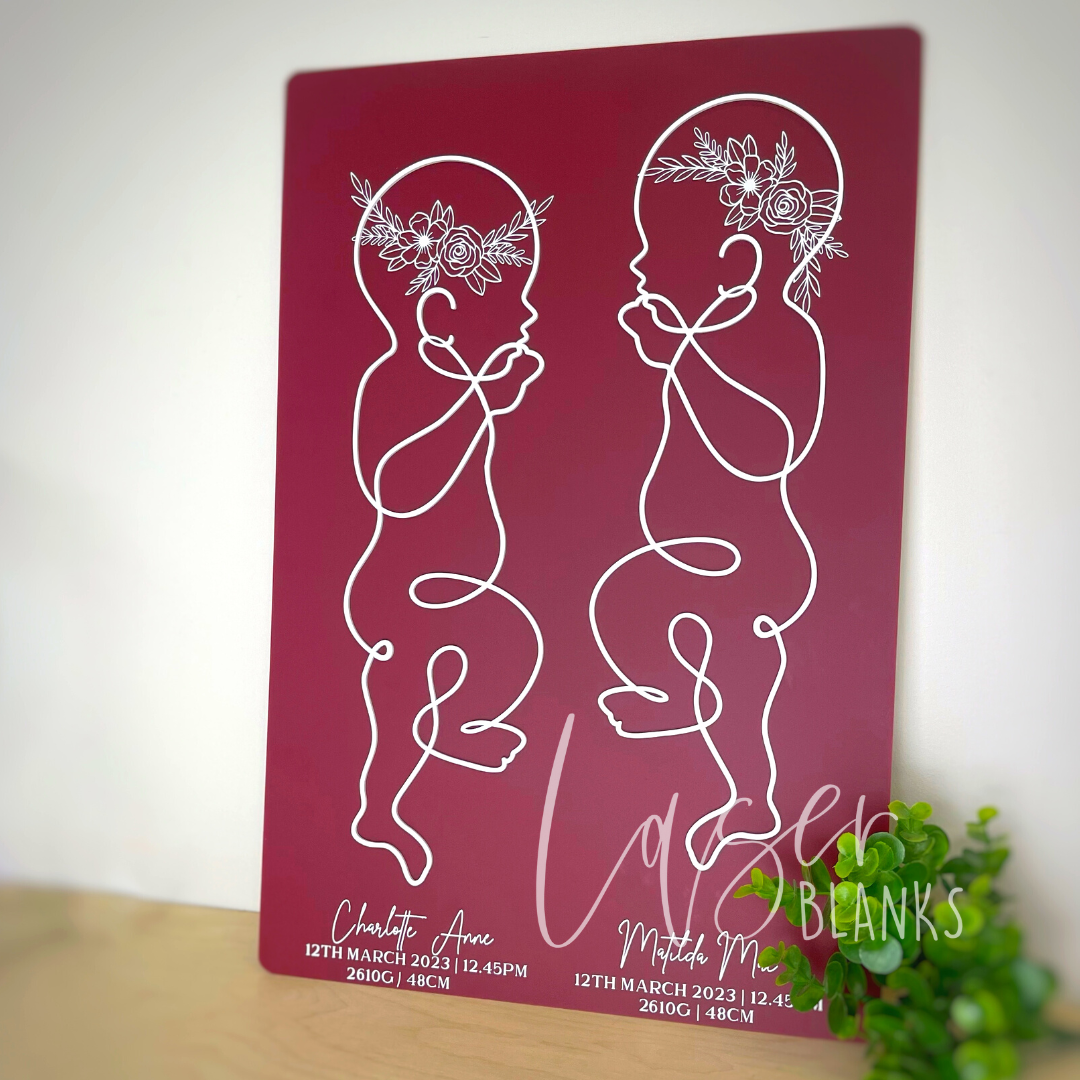
Our gorgeous baby line art piece make the most beautiful keepsakes for the years to come. These products allow you to make your own baby wall plaque in scale to the length of your baby. Made into a wall plaque, these keepsakes will capture a moment in time for you to always remember how very small your child was when they were born.
What you need:
To make a baby 1:1 line art wall plauque, you will need the following:
Our baby backing boards come in both single size and twin size. An A2 Arch also works well for a singleton giving you more room for personalisation. Today we are going to put together a Twin Baby Wall Plaque.
When creating this piece, we wanted to make a unique piece suitable for twin girls. Whilst our 1:1 Baby Line Art pieces are a brilliant stand alone product with our back boards, we wanted to add some extra personalisation with our vinyl. This is a brilliant option for those who want to add a range of different options such as:
- Angel wings
- Bow ties
- Headpiece
- Headband/bow
- Wildflower crowns and much more.
We opted for a beautiful rose and foliage head piece in our twin design. There are many different options available online for SVGs to use in your own vinyl cutting software such as Cricut Design Space or Silhouette Studio. We are big lovers of Creative Fabrica and opted for this foliage set.

This set contains 12 different styled floral pieces to use! This incredibly priced bundle will give you a large range of options to provide your clients if you're a business offering the 1:1 Line Art as a product.
Steps:
Step 1:
Begin by selecting your desired baby back board piece and the correct sized babies for your application. Our twins were both 48cm tall in this project. We also selected the twin back board in the colour 'Red Wine'. Red Wine is a great colour option for either gender and really packs a punch when it comes to the contrasting tone of white.

Our babies are a piece of art and do not have a 'flat foot' as a baby would be traditionally measured when born, but rather, is an expression of art and movement. The measurements are taken from the top of the head to the bottom of the acrylic - the toe.
Step 2:
The majority of our acrylic comes with matte on one side and gloss on the other side. Select which side you're wanting to work on. We opted to work on the matte side. Remove all protective layers from your babies and the front piece of the baby backing board that you will be working on.
Step 3:
Measure the size of the baby's head where you will be wanting the floral head piece to go. We wanted a little bit of overhang and opted for 12cm wide.
Step 4:
Load your chosen floral file in your design software and resize to your required dimensions. We added a box around our design to make weeding the piece easier. We used Siser PSV Vinyl which we purchased from our friends over at Vinyl World.

This vinyl is quite honesly a dream to weed and we LOVE it!
Step 5:
Weed your vinyl and apply to transfer tape.
Step 6:
Line up your babies where you would like them to be on the acrylic backing board. Once lined up, we positioned the vinyl in the location we wanted it to go and applied the corner of the transfer tape to the edge of the back board. We then removed the baby from underneath and simply pressed down the vinyl. This meant that the vinyl was in the perfect location.


We changed the positions of our baby's floral head pieces for each one to add a touch of individuality to each 'twin'.

Step 7:
Fix your babies to your plaque using E6000 glue sparingly. It is very important, especially when you have a brand new tube of E6000 glue to apply it with a toothpick or similar. Oozing of the glue onto the sides of the acrylic will damage the back board. It very important that you take your time to complete this step and to do it with as much care as possible.
It is important that you leave your glue to dry for 24-48 hours to ensure that the glue has dried and is ahearded correctly.
Step 8:
Allow your creativity to shine and measure up your chosen space for your baby's names and birth details.


The fonts we have chosen for the names is The Suavity and the font we chose for the birth details is called The Brittany Serrif 2.
Step 8:
Congratulations! You've just created your very own twin baby birth announcment plaque. This 1:1 Twin Baby Announcment Plauqe instructions can also be applied to creating a singleton baby plaque too!
We recommend hanging these on the wall with velcro 3M strips.
You can purchase all that you need for your 1:1 Baby Wall Plaques here.

